About Us |  Contact Us |  F.A.Q.s |  Installation
Main Products
by Car Model
ALFA ROMEO
BMW
FERRARI
FIAT
JAGUAR
MERCEDES-BENZ
PORSCHE
SAAB

Color Samples

Other Products
SPRAY DYES
FLOOR MATS
COCO MATS
CONVERTIBLE TOPS
CONVERTIBLE TOP CARE
LEATHER CARE
RAW MATERIALS
GIFT VOUCHERS
website security

Installation Instructions

Some World Upholstery products can be installed by an amateur restorer. No instructions are provided for products that we feel require a professional trimmer.

close [x]

BMW E30 Top « Installation « Home   

Questions? Call (805) 921-0100 or (800) 222-9577, Monday - Friday, 8 am to 5 pm PST. Click to e-mail us anytime!

BMW E30 Convertible (318i, 320i & 325i)

BMW E30 Convertible

BMW E30 Convertible Top Installation Instructions
For Product #s: 330-3500 & 330-3504

To Order this product by Phone, Call (805) 921-0100 or (800) 222-9577, Monday to Friday, 8 am to 5 pm PST

The following information is supplied as a customer service guide only. World Upholstery & Trim recommends professional installation of all our products. No guarantees are granted with regards to the use of this guide.


Tools required:

  • Phillips and Slotted Screwdriver
  • Scissors
  • Marking Pencil or Chalk
  • Metric Socket Set
  • Blunt Stuffing Tool (i.e. Rounded Putty Knife)
  • Awl
  • Spray Adhesive, 1 lb. (#9410)
  • or Brush Adhesive, 1 Quart (#9411)
  • Pulling Wire
  • Weatherseal Adhesive, Black (#9412)
  • Silicone Adhesive, Black (#9413)
  • Protective Blankets
  • Masking Tape
  • Pliers or Vice Grips
  • Hooked Tool
  • Rivet Gun w/ Rivets

Additional parts not included that may be required:

  • Pair of Top Straps (#330-3507)
  • Header Bow Retainer (#330-3505)
  • Top to Windshield Weatherseal (#330-3506)
  • Top to Door Window Weatherseal (#330-3522)
  • Top to Left 1/4 Window Weatherseal (#330-3523)
  • Top to Right 1/4 Window Weatherseal (#330-3524)
  • Top to Rear Deck Weatherseal (#330-3520)

General Preparations:

  1. Inspect the contents of your box against your invoice. Make sure you have the right color and material.
  2. Put masking tape for protection over the inside and outside of the plastic window on your new Top.

Pre-Installation Preparations:

  1. Protect car with fender covers or blankets to avoid damage to the finish.
  2. Release the boot lid & safety catch and then raise the lid to its vertical position.
  3. Use a marking pencil to mark the hinge position on the underside of the lid for later re-alignment.
  4. Removal of the lid provides better access to the Top and frame.
  5. Remove the lower bolts and loosen the upper ones.
  6. Carefully lift the lid from its hinges and put it aside.

Top Removal:

  1. The front door glass and header bow weatherseals should be removed carefully from the retainer to prevent tearing.
  2. Inspect the Top to windshield seal & Top to door glass horizontal seals for damage or deterioration. If necessary, replace them with part #3506 for the front seal and #3521-3522 for the side seals.
  3. Cut the factory sealant, sealing the retainer, away from the header bow.
  4. Remove the front horizontal door glass seal retainers from the frame by removing the four phillips head screws.
  5. Note the washer underneath the rear screw.
  6. Separate the tension cable from the front of the retainer (by using a thin flat bladed prying device or flat screwdriver) to carefully create an opening in the crimped portion in front of the retainer just wide enough to free the cable.
  7. Tape the retainer to the frame so that it does not become a nuisance throughout the operation.
  8. Remove the 9 phillips head screws from the header bow retainer.
  9. Using a razor blade remove the old header bow seal retainer by cutting through the sealant and through the old top along the front underside of the header bow.
  10. Use a flat screwdriver to help with the separation.
  11. Inspect the old retainer. If damaged, discard it and replace with part #3505. Special Note: The old retainer is easily damaged and most of the time not re-usable. This is not the place to be thrifty and replace if necessary.
  12. Remove the front horizontal 1/4 flap and any other frontal portion still attached to the header bow.
  13. Remove the rear 1/4 glass weatherseal assembly from the diagonal frame member in the following manner:
    1. Remove the two acorn nuts holding the seal channel support brace to the diagonal frame member. Do this very carefully so that the nuts do not fall between the body panels.
    2. Remove the support brace and put the parts aside.
    3. Remove the two rivets from within the lower portion of the seal channel using a drill with a small bit.
    4. Spread the channel open for better access and to avoid damaging the sealing surfaces with the drill bit. The seal channel will now slide out of the retainer.
    5. Remove the retainer from the diagonal frame member by drilling out the three rivets holding it in place.
  14. Inspect the diagonal weatherseals for damage or deterioration. If it's re-usable set it aside. But if necessary, replace it with parts #3523 & #3524.
  15. Use a thin, flat bladed instrument to help peel the diagonal 1/4 flap from the frame member.
  16. Raise the frame 1/2 way up so that it is in the vertical position and free the old Top from the diagonal frame member.
  17. Use a razor blade to cut the old Top away from the bows at the listings. The listings, which are made of a skim coated material, will not allow the penetration of solvents to dissolve to the adhesive.
  18. Strip the remnants of the listings from the bows and clean up any remaining old adhesive with a solvent.
  19. Raise the back rail to the vertical position and carefully start the removal of the weatherseal from the weatherseal retainer. Special Note: An old perished seal could possibly tear at the inner locking lip if caution is not exercised.
  20. Inspect the Top to rear deck weatherseal for damage or deterioration. If re-usable, put it aside. If necessary, replace it with part #3520.
  21. Remove the phillips screws holding the weatherseal retainer and put them aside, then remove the retainer.
  22. Peel the remaining reveal and back rail flaps from the back rail to free the rear portion of the Top from the frame. Use pliers if necessary to help with the separation.
  23. Once the Top is completely free from the back rail, remove it from the car.
  24. Inspect the frame and if necessary clean off any old adhesive.
  25. Lightly lubricate hinge points with a non-staining lubricant (#WD40) and wipe off any excess lubricants.
  26. Very Important!!!
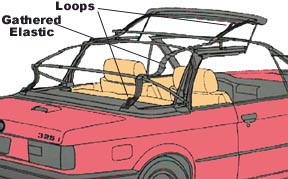
    Raise the header bow and inspect the two elastic straps running from front to rear. It is imperative that these two straps have not lost their elasticity and that the stainless steel loops in the front and back is not damaged (see image below). Failure of either of theses straps may cause premature wear and tear or small holes to appear in the convertible Top fabric. This will void your Top fabric warranty. Replacement straps (#3507) are sold in pairs only.

Before you begin, please take into consideration that the installation process will take approximately 5 hours!

Top Installation:

  1. Lower header bow and carefully set the new Top into place on the frame.
  2. Look it over to be sure everything is correct and in order. Double check that the window protection is in place.
  3. Start the installation at the diagonal frame member by fitting the pocket into the lower corner.
  4. Once the corner is set in place, go to the back rail and set the double flap under the edge of the rail, working the belt portion of the top into position. Continue the procedure around the back, pulling the double flaps underneath and straddling the top stitch on the edge of the back rail.
  5. With the back of the top evenly distributed around the rear rail, raise the back rail.
  6. Double check the flaps and corners and make sure the belt portion is properly positioned.
  7. Next apply contact cement to the back rail and inner flap. Make sure enough adhesive is applied to insure a good bond.
  8. When the adhesive has become tacky, the back portion of the inner side flap is a good place to start setting the top to the rail.
  9. The objective when setting the belt portion is to obtain a perpendicular alignment. If necessary, lower the back rail to make adjustments.
  10. When satisfied, set the inner flap permanently to the underside of the back rail.
  11. Move over to the center of the back rail and adjust the angle of incidence across the back. Special Note: The belt portion of the top should make a sharp drop off the edge of the rear rail to meet the lid at a 90 degree angle when the lid is replaced. Failure to position the top correctly here will cause air leaks and improper alignment around the doors.
  12. Again lower the rear rail to check alignment and adjust if necessary.
  13. Once the top has been properly placed on the back rail, use the stuffing tool to permanently set the inner flaps and locate and mark the trim line along the inner edge of the channel.
  14. Locate and mark the trim line for the inner side flaps as well.
  15. Trim the excess material from the inner flaps.
  16. Repeat the gluing and trimming process for the outer flaps along the back and sides.
  17. Apply contact cement to the reveal (inner) flap and to the portion of the back rail to which it will be attached. An area 4 inches wide across the full length of the flap will be enough.
  18. Wait for the cement to become tacky then set the reveal flap to the inside edge of the rail first.
  19. Use the stuffing tool to set and smooth out any irregularities in the flap.
  20. When trimming the reveal flap, keep in mind it should overlap the underlying back flaps by approximately 1/2 inch.
  21. With the belt portion of the top in place, now is the time to make one final inspection and adjustment to correct any irregularities before proceeding to the next step.
  22. Next re-install the weatherseal retainer to the underside of the back rail.
  23. Start with the last hole on the each end of the retainer and re-install that retainer screw.
  24. Using an awl to pierce the new flaps, line up the holes in the weather seal retainer rail with the respective holes in the back rail and install the remaining screws. With the weather seal retainer now in place, the back rail section of the top is near completion.
  25. Starting at the end of the retainer, use the stuffing tool and work the weatherseal back into the interlocking retainer.
  26. Work your way around the rail, placing the inner lip of the weatherseal into the retainer groove.
  27. Lower the back rail and lock it in place by holding it down while lowering the header bow.
  28. Move to the front of the frame and raise the header bow.
  29. Apply contact cement to the underside of the header bow and the front edge of the Top.
  30. Wait for the cement to become tacky then use the first bow and listings as a gauge for setting the Top to the header bow. This will help provide uniform placement of the listing stitch on the first bow and even the tension across the front of the deck.
  31. Work your way across the front little by little.
  32. Lower the header bow to check for the alignment of the listing stitch and fit as you go along. The Top should now be in place on the header bow.
  33. Now install the side tension cables as follows:
    1. Raise the header bow to the vertical position.
    2. Insert a catch wire through the side cable sleeve so that it goes in the front and out the back.
    3. Catch the ferule at the end of the tension cable and pull it through the sleeve.
    4. Return the end of the side tension cable to its place at the front of the weatherseal retainer and push it back into the groove.
    5. With a pair of pliers or vice-grips, crimp the cable tightly into the groove. Then check the cable to make sure it is tight.
  34. Re-install the door glass weatherseal retainer to the horizontal frame member. Don't forget the washer for the back screw!
  35. Install the remaining screws.
  36. Latch the header bow and move back to the diagonal flaps.
  37. Apply contact cement to the diagonal flaps and frame members.
  38. Wait for the adhesive to become tacky then set the flaps adjusting the top on the frame so that the binding sits properly on the edge.
  39. Retract the frame, mark then trim the excess material from the flaps. Make sure the flap is wide enough to completely underlay the weatherseal retainer.
  40. Put the weatherseal retainer back in place on the diagonal frame member and use an awl to locate the respective holes and pierce the flap.
  41. Make sure the awl does not go through the top material behind the flap.
  42. Re-rivet the retainer in place, slide the weatherseal back into the retainer and re-rivet the two rivets holding the seal.
  43. Replace the seal channel support brace with the two acorn nuts. Be careful not to drop the nuts between the body panels.
  44. Move to the front header bow to begin installing the header bow seal retainer.
  45. With an awl locate the respective holes.
  46. Lay a bead of sealant on the back of seal retainer and beginning in the center, replace the phillips screws.
  47. Begin installation of header bow weatherseal in the middle of the header bow.
  48. Use a blunt stuffing tool to carefully push the lip of the weatherseal into the retainer and continue down the horizontal retainers on each side.
  49. Place a small amount of sealant behind the forward corners of the header weatherseal.
  50. Close and latch top. Clean off any excess sealant or adhesive.
  51. Allow sealant to dry with top latched closed.
  52. Move to the inside of the car to begin installation of bow listings.
  53. UUsing a piece of cardborad or similar protection, apply contact adhesive to the front bow and underside of listing.
  54. Wrap the forward listing first, smoothing out any wrinkles.
  55. Re-apply cement and wrap the rear listing over the forward one, smooth out any wrinkles and tuck the edge up under the bow in front.
  56. Move to the other bows, and repeat the process.
  57. Unlatch and raise rear rail.
  58. Re-install the boot lid by aligning with marks made previously. Lower & latch the lid and check the fit.
  59. Lower and latch the rear rail and header bow.
  60. Remove the rear window protection and all the tools and blankets.

Elapsed Time: Approximately 5 hours


www.worlduph.com is a registered trademark.
Any copying or reproduction of any kind must be approved by a written contract.
This website is maintained by World Upholstery & Trim Webmaster


Terminologies:

Over the years, different terminologies have been used for the same parts. To minimize confusion we've collected many of the different names to give customers some reference to the different Alfa Romeo, Mercedes-Benz, BMW, Porsche, Ferrari, Fiat and Jaguar trim parts that vary in terminology around the world.

Convertible top = soft top, rag top, head, hood, hooding, soft window Targa top, retractable top, vinyl top, top boot, convertibles arriba, converteerbare boven
Carpet = rug, rugs, carpet kit, carpet set, molded carpet, cut and bound carpet.
Seating = seat kit, upholstery kit, leather upholstery, sport seat, recaro seat, vinyl seat, cloth seat, sitzkissen, perforated, perforiert, embossed, sitzpolsterung, imbottitura sedile, asiento tapizado
Sealing = rubber seals, weatherstrips, weatherseals, door seals, window seals, gaskets, dichtungsrahmen
Panels = door panels, linings, trimmings, coverings, sun visor, sunvisor, sonnenblenden, headliner, himmel bespannung, encabezando
Trunk = boot

Materials:

Leather = hide, side, skin, cowhide, leder, cuero, Connolly, Roser, Bridge of Weir, cuoio, split
Carpet = Abetone, Dorsett, FTV, feintuft, loop, cut pile, Wilton, perlon, tufted, automatico de alfombras, teppich, tapijt, tapis
Vinyl = Spradling, China General, Freudenberg, MB Tex, ambla, leathercloth, rexine, hardura, ICI, vinyle, naugahyde
Topping = Happich, Stafast, STF, Aresma, Sonnendeck, Sunfast, dobby, lienzo, leinwand
Seat Pad =  rubber fiber pad, foam pad, gummihaarauflage, almohadilla
Sunvisor = sonnenblend, pare soleil, domenica visiera, zonneklep